Midas NFX: Analysis Results Evaluation [IAD 7]

Author: Gabriel Roade
Publish Date: 27 Dec, 2021
From the series Introduction to Analysis for Designers...
7. Analysis Results Evaluation
In this series, we have been discussing the procedures of mesh creation and FEM analysis. In this last article, the results of analysis and the matters to be considered when evaluating them, will be discussed.
The procedure of evaluating analysis results is generally called “post-processing,” and the software required to do so is called a “post-processor.” Post-processing can be distinguished into two areas:
- Validation of the analysis conditions: Verifying whether the calculation was performed as intended.
- Evaluation of the analysis results: Evaluating the qualitative trends and values such as stress or natural frequency.
When a calculation is completed, the results are confirmed by evaluation in accordance to (2). However, it is preferable to first confirm the validity of the analysis model by use of (1); the evaluation of analysis results begins by determining whether the analysis conditions are valid. Whether or not the designer builds an accurate analytical model is normally judged by confirming if the interpretation results are similar to the presumed results. When comparing the expected results with the actual analysis results, the first thing one should pay attention to are the position of stress concentrations and the direction of the stress acting prior to deformation, and then any other parameters. If the results are as assumed, it can be judged that the analysis has been executed without any problems.
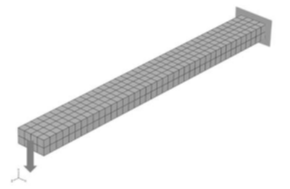
Figure 1: Cantilever Beam Model
To determine the validity of the analysis results, it is also desirable to compare the predictions of the stress distribution with the calculated results. Consider the interpretation of the simple cantilever model shown in Fig. 1. This model is completely constrained on the right side, it has a rectangular cross section and it has a load applied downward on its left side; this model is often used as an example in material mechanics or structural analysis textbooks.
From the viewpoint of material mechanics, it is easy to imagine that when this model is analyzed, tensile stress is generated in the upper part of the beam and compressive stress in the lower part. It is also possible to predict that the maximum tensile stress will be generated in the upper right corner in the longitudinal direction of the beam.
The actual analysis results can be confirmed by the maximum principal stress outline in Fig. 2; the maximum principal stress is an indicator of tensile stress. As expected, a large tensile stress is generated on the upper surface near the constrained surface.
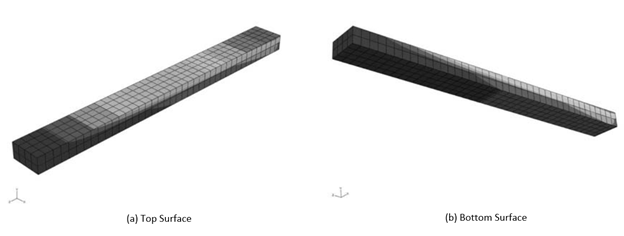
Figure 2: Maximum Principal Stress Outline
Next, we examine the vector diagram to check the direction of stress generation. The vector diagram shows not only the magnitude of the stress but also the direction in which the stress is occurring, so that the strain state can be grasped in more detail. Special attention must be paid to the maximum and minimum principal stresses in the stress vector diagram.
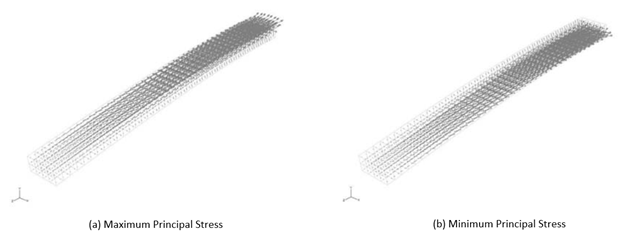
Figure 3: Vector Diagram of Principal Stresses
The maximum principal stress is observed to have a positive value while the minimum principal stress has a negative value; this is due to the exhibited compressive stress. For example, if we imagine that the object is broken by simply splitting or collapsing, the vector of maximum principal stress will be orthogonal to the direction of splitting, and the vector of minimum principal stress will be in the direction of sagging. If we look at Fig. 3, considering that we expected that the stress would be generated in the longitudinal direction of the beam, we can see that the results agree by (a), a large vector on the top of the beam, and (b), the stress generated in the longitudinal direction on the lower surface. Through this process, the analysis results are confirmed to be at least qualitatively reliable.
So, what if the qualitative trend of the interpretation is significantly different from what you think? The first thing to look at is variation. It is advisable to first check whether the deformation of the calculation result is within the assumed range, expected from the specific constraint and load condition. More concretely, there are several reasons why the shape of the transformation is much larger than the assumption; consider the following four cases:
- Constraints are not set as expected
- Load conditions are not set as expected
- Material properties are incorrect
- Plate thickness is incorrect (in case of structural analysis)
If you are unsure about the results of any analysis, check the above items first. If you look at the results intently, you will most likely find errors like the ones mentioned above. In the case that there is no error in the setting of load conditions, constraints and physical properties, it becomes somewhat more difficult to identify the cause of discrepancy.
In that case, where there is no problem with the setting of conditions, the cause may be:
- The physical phenomena assumed by the loads and constraints are not represented correctly
- The calculation is correct, but there are two solutions to the same problem
In any case, comparing the assumed physical phenomena and the deformation calculated, it is necessary to figure out whether the deformation expected is valid, and why the deformation calculated differs. For this, it is necessary to apply trial-and-error to understand what assumptions can and cannot be made; this process is difficult and has no secret formula to it.
At first, it is only necessary to repeat and review the analysis process properly with the help of analysis experts. Moreover, the repetition of these tasks will make it possible for you to see the errors in future results more easily.
Once we have confirmed that the analysis was performed as expected, it is time to further evaluate the qualitative trends and the quantitative values of stress. Let’s briefly describe here the basic indicators when evaluating results. As described in the second chapter of this series, it is also good to keep in mind that the quantitative accuracy of the results depends on the size of the mesh and is therefore hard to judge. If necessary, it is possible to identify the stress concentration values by using denser meshes at their locations.
The most effective results for evaluation in structural analysis are the contour lines and the vector lines. However, there are several kinds of stresses other than the maximum and minimum principal stresses described above; typical examples are the coordinate axis component, von Mises stresses, and the like.
Principal stresses are not only checked with vectors, as in Fig. 3, but also with the contour lines exemplified in Fig. 2. Contour lines ignore the direction of the principal stresses and expresses only their values by outlining them. The contour map is mainly used for confirming the total stress distribution. For example, if the direction of the tensile compressive stress is obvious, as in the model in Fig. 1, the contours can be used to judge the accuracy of the results.
The coordinate axis components in Fig. 4 are often used for comparison with experimental results. A strain gauge is often used to measure stiffness experimentally, and a strain gauge has a direction. Therefore, when comparing with analytical results, it is necessary to extract and compare only the stress components in the specific direction the strain gauge was set on.

Figure 4: Coordinate Axis Components of Stress
The von Misses stresses shown in Fig. 5 are often used to evaluate the likelihood to fracture of the structure. In general, the designed structure is in a three-dimensional stress state, but the von Misses stresses converts the physical quantity into scalar values in order to easily understand the stresses in the three coordinate axis directions; it is possible to check the yield of the material by confirming these stress values. If the von Misses stress value is larger than the yield stress of the material, the material in that area will most likely experience plastic deformation.
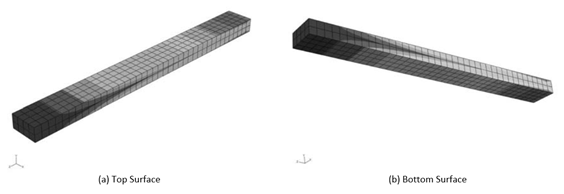
Figure 5: Von Misses Stress Distribution
Finally, the strain energy represented in Fig. 6 shows the amount of energy accumulated by deformation, which can be used to determine where the fracture energy will be located. It is possible to design a safe structure by checking the position of the strain energy and changing the design to avoid the discovered concentration.
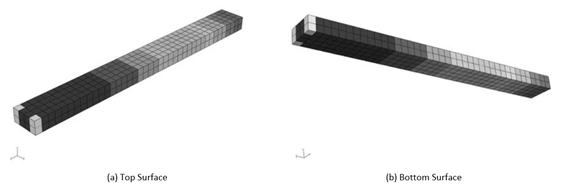
Figure 6: Strain Energy Distribution
The criteria for evaluating a structure to be designed depends on the characteristics of the structure itself and on its usage conditions. It is advisable not to blindly interpret it but to consult an analysis expert before deciding on an evaluation method.
Conduct your analysis for FREE!
| |
Speaker : Gabriel Roade Category : Mechanical Software : midas MeshFree Date : 2018-11-12 |

Add a Comment