Author: Jorge Liviapoma
Publish Date: 7 Feb, 2024
|
Summary: In this video guide, we'll cover the basics of retaining wall design using MIDAS software. Geared towards MIDAS Civil beginners, we'll walk through each step, demonstrating results and leveraging built-in design functions. Let's dive into a simple example from a textbook problem to grasp the essentials of retaining wall design with MIDAS Civil. |
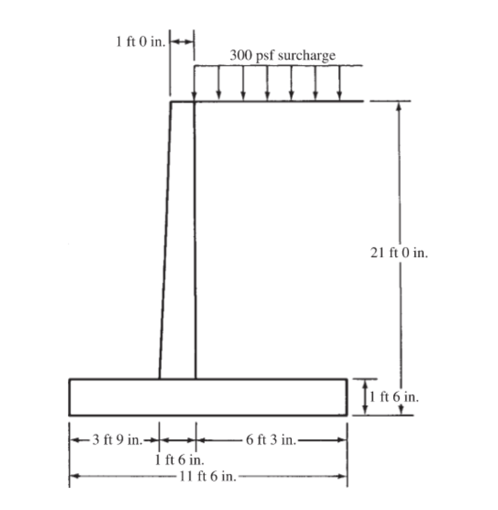
Fig 1. Retaining Wall Example 13.3 (McCormac, Jack C. - Design of Reinforced Concrete)
Retaining Wall Design: Setting up the Model
Nodes
Nodes play a crucial role as fundamental coordinates in your retaining wall model. Think of them as essential reference points that define the structure's geometry and connectivity. Part 1 of the video series will provide guidance through defining these points to create a strong base for your model with create nodes and translate functions.
Element Definition with material and section properties
Transitioning to element definition after establishing nodes. The first part of this video series demonstrates the process of defining concrete properties in the material properties. Additionally, we'll explore how to modify the shape and orientation of your retaining wall under section properties.
-
Tip: Use Query Nodes (F4 shortcut) to measure any distance!
Tip: Orientation of tapered sections can be modified with the offset function when defining the section property.
Retaining Wall Design: Dead Load and Boundary Condition
Boundary Conditions
Boundary conditions serve as essential constraints that emulate real-world scenarios. The later videos will provide guidance on how to modify the location of the boundary to obtain the governing forces for different structural components.
-
When doing a 2-D model, consider changing the Structure Type to a two axis plane to avoid unstable boundary conditions.
Self-Weight
Consider the weight of the wall and footing itself. The video will show you how to define this load case and will automatically calculate this weight in your model. Make sure everything adds up correctly by checking the weight with hand calculations. This step will help you find any errors in your model.
Video:Retaining Wall Design: Horizontal/Lateral Loads
Earth Surcharge Load & Horizontal Earth Pressure
Earth surcharge is the extra weight placed on a retaining wall due to nearby soil or structures. While horizontal earth pressure is the sideways force from the soil against the retaining wall. As the soil pushes, it generates horizontal forces affecting the entire structure.
The video demonstrates how MIDAS makes it easy to add uniform and trapezoidal pressures to your model.
-
Tip: The local axis of each element can be checked with Display (CTRL+E shortcut) when choosing the direction of the load.
-
Tip: Dummy beams can be used to accurately distribute loads across a structure. They can be created by modifying the section property to a miniscule area or material property with a weight density of 0.
Retaining Wall Design: Results and Verification of Forces
MIDAS provides a clear visualization of results. Use Reactions to confirm all forces and moments applied to the model.
-
Tip: Check Values and Legend to see location of controlling results
- Video:
Overturning and Sliding Safety Factors
For retaining walls, stability is everything. The overturning factor guards against the wall tipping over, while the sliding factor ensures the wall stays put, resisting horizontal forces. Part 3 of the video series shows how one can easily utilize the results obtained from MIDAS in a post processing spreadsheet to calculate these safety factors.
-
Tip: Use Load Combinations to quickly obtain righting moment and overturning moment.
- Video:
Retaining Wall Design using design functions within MIDAS
MIDAS is packed with powerful design tools to help you whip up a preliminary design that satisfies all the code design criteria. We're going to first discuss some of the software' limitations but will also provide some work around solutions so that any retaining wall can be designed within MIDAS civil. In the fourth video, we'll break down what MIDAS can and can't do after you have your results and are ready to design the stem wall, footing heel and toe. We'll play around with the RC Beam Section for Design to nail down our initial reinforcement area. Then, the RC Beam Section for Checking will be explored to see how our reinforcement stacks up in the demand applied versus capacity of the element.
- Tip: Change the Section Property to DB/User to be able to use the built-in
design features. - Tip: Under Common Parameters the member type can be switched to beam/column/brace depending on what type of member you are trying to design.
-
Tip: Ensure to properly apply your load combinations on Concrete Design in order to use the built-in design features
- Video:
-


Add a Comment